- Choose an image
Step 2:
- Duplicate the layer (right click on the primary layer and choose duplicate layer)
- And change that layer to "Color Dodge" (just follow the encircled part on the image)
Step 3:
- Press "Ctrl+1+I" to invert the image. (the image turn into white background, that's perfectly normal).
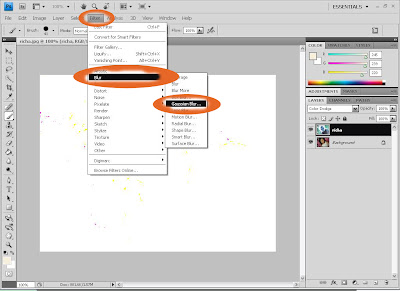
- Then, choose "Filter", "Blur" and then "Gaussian Blur".
Step 4:
- Then change the Radius into "7.0" pixel then press OK.
Step 5:
- Then go to "Layer", then "New Adjustment Layer" and "Threshold".
Step 6:
- Change the threshold level to
"234" then press "OK".
Step 7:
-Create a new layer or simply press "Shift+Ctrl+N".
Step 8:
-Change that layer to "Multiply". (Follow the encircled part on the images.)
Step 9:
- Choose "Brush" tool and select the color of your type (for the hair, skin tone, lips, eyes, etc.). And simply apply it to the corresponding part.
Cartoon Yourself Tutorial :)
Minggu, 18 Juli 2010
14.31
|
Label:
anime,
cartoon,
pen tool,
photo edit,
photo editing,
photo manipulation,
Photoshop,
photoshop effects,
photoshop tutorial,
pictures,
vector,
vector art
|
This entry was posted on 14.31
and is filed under
anime
,
cartoon
,
pen tool
,
photo edit
,
photo editing
,
photo manipulation
,
Photoshop
,
photoshop effects
,
photoshop tutorial
,
pictures
,
vector
,
vector art
.
You can follow any responses to this entry through
the RSS 2.0 feed.
You can leave a response,
or trackback from your own site.
Langganan:
Posting Komentar (Atom)


0 komentar:
Posting Komentar