Photoshop Effect And Tutorial

  • Entries
  • Comments

  • Home
  • Posts RSS
  • Comments RSS
  • Edit

menggunakan marquee tool

Rabu, 25 Februari 2009

Mempelajari bagaimana menggunakan marquee tool di Photoshop, serta lasso, Polygonal lasso, dan magnetic lasso tool.

The marquee tools


Setelah Anda memilih salah satu bagian dari suatu gambar (misalnya orang kepala atau benda lainnya), Anda dapat memanipulasi objek ini secara terpisah dari sisa dari gambar. Hal ini berarti Anda dapat memotong objek keluar; menambahkan drop bayangan; menyesuaikan kecerahan / kontras; melelehkan komponen itu; menerapkan efek filter dan apapun yang Anda suka!

untuk menggunakan salah satu marquee tool, klik dan tarik keluar dengan pemilihan mouse pada gambar Anda:

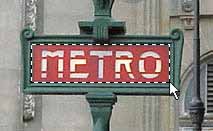
Membuat seleksi dengan rectangular marquee tool

Dengan menahan tombol Shift sambil menariknya, anda dapat membentuk persegi (untuk Rectangular Marquee tool) atau lingkaran ( Elliptical Marquee tool):
Membuat surat edaran seleksi berbentuk bulat panjang dengan tenda besar alat


The lasso tools


Lasso tool

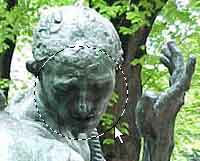
bagus digunakan untuk seleksi kepala orang.

Polygonal Lasso tool


Polygonal laso alat yang digunakan untuk membuat pilihan berdasarkan garis lurus (atau segmen). Hal ini memungkinkan Anda lebih tepat ketika memilih menggunakan kontrol mouse. Klik dengan mouse di gambar Anda untuk menambahkan titik pengancing pertama, kemudian gerakkan mouse dan klik lagi untuk membuat yang baru dengan pengikatan titik di antara segmen. Lanjutkan dengan cara ini hingga selesai, maka pilihan menutup perbatasan dengan menggerakkan mouse pada satu titik dan mengklik (double klik dengan mouse juga akan menutup secara otomatis pilihan). Try it!
Polygonal lasso menggunakan alat

Magnetic Lasso tool

Magnetic lasso mirip dengan Polygonal, tetapi mencoba untuk menambahkan pengancing poin secara otomatis berdasarkan daerah contras yang Anda memilih. Oleh karena itu, magnetic lasso karya terbaik ketika memilih daerah yang kontras dengan baik dengan lingkungan. Polygonal sebagai dengan alat ini, anda klik untuk keluar. Anda juga dapat menambahkan sendiri dengan mengklik poin. Selesai pemilihan dengan menggerakkan mouse pada satu titik dan klik, atau hanya dua kali.
menggunakan magnetic lasso

cara mengatur ukurannya:

atau anda bisa mengaturnya sendiri


20.42 | Label: basic photoshop | 0 Comments  

funtastic blending

Selasa, 24 Februari 2009

pada kesempatan ini saya akan menulis artikel tentang variasi blending layer:
saya menggunakan 4 gambar di bawah ini:


pertama:
selection pada object manusia
karena background belakang 1 warna maka kita dapat mengunakan magig wand tool
secara otomatis object sudah terseleksi


kemudian atur feather
tekan crtl + alt + d

atur menjadi 1 pixels

kedua:
setelah selesai buat dokumen baru
tekan ctrl+N


setelah itu drag semua gambar ke dokumen baru
dengan urutan sebagai berikut:


setelah selesai hal terpenting dalam oldig ini adalah pilihan blending layer

blending layer itu adalah yang bergaris merah lihat gambar dibawah


contoh pengaturan blending:


blending 1

layer 4 : lighten
layer 5 : darken
layer 3 : normal
layer 4 : normal

hasilnya:


blending 2:

layer 4 : lighten
layer 5 : hue
layer 3 : normal
layer 4 : normal

hasilnya:

blending 3

layer 4 : lighten
layer 5 : saturation
layer 3 : normal
layer 4 : normal


blending 4
layer 4 : lighten
layer 5 : color
layer 3 : normal
layer 4 : normal
hasilnya:


blending 5
layer 4 : soft light
layer 5 : color
layer 3 : vivid light
layer 4 : normal
hasilnya:


blending 6
layer 4 : difference
layer 5 : color
layer 3 : vivid light
layer 4 : normal
hasilnya:


blending 7

layer 4 : hue
layer 5 : color
layer 3 : vivid light
layer 4 : normal
hasilnya:

blending 8

layer 4 : saturation
layer 5 : color
layer 3 : vivid light
layer 4 : normal
hasilnya:

keliatannya sudah banyak.........??? bagi anda yang ingin lebih bermain dengan blending layer anda bisa mengubahnya sendiri
atau bisa juga anda mengurangi atau menambah opacity layer tersebut
selamat mencoba...

22.27 | Label: intermediate, photo effect | 0 Comments  

IR 1 (revisi 2)

untuk tutorial ini, sebelum anda melanjutkannya saya saran kan anda menguasai tutorial IR 1


langkah pertama masuk ke channel mixer dengan catatan anda harus merubah gambar menjadi kuning orange ( liat tutorial IR 1)


kemudian atur color mode kuning
seperti gambar di bawah

pilih blending normal:


hasilnya:


07.24 | Label: infra red, photo effect | 0 Comments  

IR 1 (revisi 1 )


untuk tutorial ini, sebelum anda melanjutkannya saya saran kan anda menguasai tutorial IR 1

langkah pertama masuk ke channel mixer dengan catatan anda harus merubah gambar menjadi kuning orange ( liat tutorial IR 1)

kemudian atur color mode kuning
seperti gambar di bawah


pilih blending layer normal


lihat hasilnya:

07.16 | Label: infra red, photo effect | 0 Comments  

cara menggunakan filter offset

klik menu filter--->>other--->> offset

*saya menggunakan horizontal + 242 agar gambar terpotong sesuai keinginan saya


hasilnya


07.04 | Label: basic photoshop, photo effect | 0 Comments  

sepia


langkah pertama untuk membuat photo sepia adalah
membuat gambar menjadi bw. caranya:
shift + ctrl + U


kemudian: mengatur color balance:
ctrl + B

(atur sesuai gambar di bawah)


hasilnya:


06.39 | Label: basic photoshop, photo effect | 0 Comments  

rotate image

Senin, 23 Februari 2009


klik menu image -->> rotate canvas 90cw


klik menu image -->> rotate canvas 90ccw


klik menu image -->> rotate canvas arbitrary..
rotate arbitrary memungkinkan anda mengubah rotasi dengan sudut sebesar yang anda minta
contoh di bawah ini mnggunakan sudut 17 derajat


klik menu image -->> rotate canvas flip canvas horizotal


klik menu image -->> rotate canvas flip canvas vertical


19.27 | Label: basic photoshop | 0 Comments  

membuat gambar BW (hitam putih)

gambar BW atau hitam putih dapat dibuat dngan beberapa cara, pada kesempatan kali ini saya akan menulis 3 cara membuat gambar hitam putih


with channel mixer with desaturate with mode grayscale


1. with channel mixer
cukup simple cara membuatnya:
buat layer baru : klik menu layer --->> new --->> layer from bacground
copy layer menjadi dua
klik menu image --->> adjusment --->> channel mixer

kemudian atur sesuai gambar di bawah


hasilnya:


2. dengan desaturate

cara yang paling mudah hanya dengan menekan shift + ctrl + U


hasilnya:


3. with mode grayscale

cara nya juga cukup simple cukup klik menu image --->> mode --->> grayscale

setelah kita pindah ke mode grayscale gambar akan berwarna hitam putih

18.58 | Label: basic photoshop, photo effect | 0 Comments  

Postingan Lebih Baru Postingan Lama Beranda
Langganan: Komentar (Atom)


  • Labels

    • Actions (33)
    • Actions: ActionSection (2)
    • Actions: Canvas Painting Effect (1)
    • Actions: Cross Processing Action (1)
    • Actions: Cross Processing Curves (2)
    • Actions: Dark Gloomy Effect (1)
    • Actions: Dragan Effect (1)
    • Actions: Dream Big Vol 1 (1)
    • Actions: Dream Big Vol 2 (1)
    • Actions: Enhance Portrait Coloring (1)
    • Actions: Glowing Model (1)
    • Actions: Icon Coloring in Photoshop (2)
    • Actions: Old Vintage Photo (2)
    • Actions: Pencil Sketch Effect (1)
    • Actions: Polaroid Coloring (1)
    • Actions: Retro Old Photo Effect (1)
    • Actions: Text Effects (3)
    • Actions: Turn Photo to Cartoon Effect (1)
    • Actions: Yellowish Retro Coloring (1)
    • anime (1)
    • background change (1)
    • basic photoshop (12)
    • Beginner Tutorial (4)
    • black and white background (2)
    • body resizing (1)
    • Brushes: All (23)
    • Brushes: Blood Splatter (2)
    • Brushes: Butterfly (2)
    • Brushes: Doodles (2)
    • Brushes: Floral (2)
    • Brushes: Frame Border (2)
    • Brushes: Grunge (2)
    • Brushes: Halloween Brush Set (1)
    • Brushes: Polaroids (2)
    • Brushes: Swirl and Curl (2)
    • Brushes: Text (2)
    • Brushes: Vector (2)
    • Brushes: Wings (2)
    • cartoon (1)
    • clear photo (8)
    • clipping path (12)
    • clone stamp tool (2)
    • color adjustments (2)
    • color correction (1)
    • colorizing (1)
    • contest (1)
    • Cropping (2)
    • CS4 (2)
    • diffusing glow effect (1)
    • flip an images (1)
    • Fonts (15)
    • Fonts: All (2)
    • Fonts: All Uppercase (1)
    • Fonts: Cute (1)
    • Fonts: For Icons (2)
    • Fonts: Grunge (2)
    • Fonts: Handwriting (4)
    • Fonts: Poster (1)
    • Fonts: Romantic (3)
    • Fonts: Script (1)
    • Icon Coloring in Photoshop (30)
    • Image Saving (2)
    • infra red (3)
    • Inspiration (24)
    • Inspiration: 3D Typography (1)
    • Inspiration: Anti-smoking ads (2)
    • Inspiration: cats photos (2)
    • Inspiration: Color Combo for Design (1)
    • Inspiration: Colorful Patterns (1)
    • Inspiration: Creative Photos (2)
    • Inspiration: Ideas that Brighten Up Your Day (1)
    • Inspiration: Little Things (1)
    • Inspiration: Logo Design (2)
    • Inspiration: Miniature Photography (2)
    • Inspiration: Rule of Thirds (2)
    • Inspiration: Scenic and Landscapes Wallpapers (2)
    • Inspiration: Selective Coloring Photos (1)
    • Inspiration: Simple Desktop Wallpapers (1)
    • Inspiration: Toy Story (1)
    • Inspiration: Typography (2)
    • intermediate (26)
    • light adjustment (1)
    • link (2)
    • manipulation (11)
    • more (283)
    • pen tool (12)
    • Photo Albums (3)
    • photo edit (15)
    • photo editing (16)
    • photo effect (29)
    • Photo Effect in Photoshop (81)
    • photo manipulation (3)
    • photo retouch (6)
    • Photo: Black and White Photography Effect (2)
    • Photo: Blue Tone Coloring (2)
    • Photo: BW Image with a HInt of Color (2)
    • Photo: Canvas Painting Effect (2)
    • Photo: Classic Coloring Photo (1)
    • Photo: Colorful Gradient Effect (2)
    • Photo: Combined Polaroid Effect (1)
    • Photo: Comic Effect (2)
    • Photo: Create Photo From Text (1)
    • Photo: Cross Processing in Photoshop (2)
    • Photo: Dashed Line Around Cutout Image (1)
    • Photo: Dotted Pixelated Photo (1)
    • Photo: Dramatic Rain Effect (2)
    • Photo: Fill Shape with Text (1)
    • Photo: Fisheye Effect (1)
    • Photo: Fun Effect in Photoshop (1)
    • Photo: Get a Glowing Image (2)
    • Photo: Glamorous Magazine Glow Look (2)
    • Photo: Glowing Angelic Effect (2)
    • Photo: Glowing Demon Eyes Effect (2)
    • Photo: Halftone Pattern Effect (2)
    • Photo: Halftone Retro (2)
    • Photo: Halftone Wave Effect (1)
    • Photo: Lens Flare (1)
    • Photo: Light Effects (2)
    • Photo: Lomo Effect (1)
    • Photo: Metallic Toning Potrait (1)
    • Photo: Miniature Model Look (2)
    • Photo: Mosaic Effect (1)
    • Photo: Nostalgic FairyTale Effect (2)
    • Photo: Old Photo Sephia Effect (2)
    • Photo: Pencil Sketch Effect (2)
    • Photo: Photo Editing with Gradient Map (1)
    • Photo: Pop Art Tutorial (2)
    • Photo: Popping Reds (1)
    • Photo: Retro Polaroid Coloring (2)
    • Photo: Single Color Image (2)
    • Photo: Sketch Effect (1)
    • Photo: Stencil Art Effect (2)
    • Photo: Turn 2D Image to 3D (2)
    • Photo: Turn Image to Cartoon (2)
    • Photo: Turn Photo to Vector Art (2)
    • Photo: Vignette Effect (1)
    • Photo: Vintage Sepia Tone (2)
    • Photoshop (17)
    • photoshop action (4)
    • photoshop border (1)
    • photoshop brush (11)
    • photoshop effects (4)
    • photoshop fix (5)
    • photoshop plug in (17)
    • photoshop review (12)
    • photoshop tips and tricks (1)
    • photoshop tutorial (16)
    • pictures (16)
    • poster (1)
    • pribadi (1)
    • PS Techniques and Tricks (42)
    • PS: BW Watercolor Painting (2)
    • PS: Change Image Color (2)
    • PS: Create Border (2)
    • PS: Create Dotted and Dashed Border (1)
    • PS: Creating Borders (1)
    • PS: Cutting Image Out of Background (2)
    • PS: Delete Background using Extract Filter (2)
    • PS: Dotted Pattern (2)
    • PS: Full List of Tips (1)
    • PS: Icon Coloring Action Files (2)
    • PS: Icon Cropping Tips (2)
    • PS: Image Editing using Adjustment Layer (2)
    • PS: Keyboard Shortcuts (2)
    • PS: Learn how to use Photoshop Actions (2)
    • PS: Rising Sun Effect (2)
    • PS: Rotate Brushes (2)
    • PS: Rounded Edges and Puzzle Effect (2)
    • PS: Rounded Edges Border (1)
    • PS: Rule of Thirds (2)
    • PS: Save and Use Pattern (2)
    • PS: Simple Image Blending (2)
    • PS: Smart Guides (2)
    • PS: Sunburst Effect (2)
    • PS: Turn Photo to Comic Sketch (2)
    • PS: Using Light Textures to Decorate Photo (1)
    • PS: Using Photo Effect Action (1)
    • PSD (32)
    • PSD: 5 Popular Coloring Effects (1)
    • PSD: ALL (1)
    • PSD: Caramel Coffee Coloring (1)
    • PSD: Coloring (2)
    • PSD: Dark Chocolate Coloring (1)
    • PSD: Dream Big Vol 2 (1)
    • PSD: Fade Coloring on Your Photo (1)
    • PSD: Faded Spring Color (1)
    • PSD: Gradient Photo FX (1)
    • PSD: How to Use Coloring PSD (2)
    • PSD: Image Coloring (1)
    • PSD: Mosaic Photo Template (1)
    • PSD: Polaroid Coloring (1)
    • PSD: Pop Art Coloring (1)
    • PSD: Retro Gradient Coloring (1)
    • PSD: Soft Pink Coloring (1)
    • PSD: Summer Sunshine Color (1)
    • PSD: Yellowish and Greenish Coloring (1)
    • special effect (2)
    • techniques (1)
    • text effect (17)
    • text on images (1)
    • Text: Bling Text Effect (2)
    • Text: Glowing Apple Mac Text (2)
    • Text: Glowing Neon Light Text (2)
    • Text: Glowing Text (2)
    • Text: Reflection Text (2)
    • Textures: Abstract (2)
    • Textures: All (39)
    • Textures: Clouds (2)
    • Textures: Colored Pattern (1)
    • Textures: Fabric (1)
    • Textures: Floral (2)
    • Textures: Geometric (2)
    • Textures: Gradient Set (1)
    • Textures: Grunge (5)
    • Textures: Grunge Paint (2)
    • Textures: Grunge Set 1 (2)
    • Textures: Lights (1)
    • Textures: Paper (5)
    • Textures: Pattern (2)
    • Textures: Pattern Sites (2)
    • Textures: Retro Color (1)
    • Textures: Scrapbook (1)
    • Textures: Stripes (10)
    • Textures: Wood (1)
    • transparent background (1)
    • tutorial (1)
    • unwanted objects (1)
    • vector (1)
    • vector art (1)
    • with action (13)

    Blog Archive

    • ► 2011 (42)
      • ► November (4)
      • ► Oktober (7)
      • ► September (2)
      • ► Juli (3)
      • ► Juni (2)
      • ► Mei (5)
      • ► April (5)
      • ► Maret (6)
      • ► Februari (4)
      • ► Januari (4)
    • ► 2010 (50)
      • ► November (1)
      • ► Oktober (6)
      • ► September (3)
      • ► Agustus (3)
      • ► Juli (4)
      • ► Juni (12)
      • ► Mei (8)
      • ► April (6)
      • ► Maret (1)
      • ► Februari (1)
      • ► Januari (5)
    • ▼ 2009 (168)
      • ► Desember (3)
      • ► November (7)
      • ► Oktober (11)
      • ► September (3)
      • ► Agustus (9)
      • ► Juli (4)
      • ► Juni (7)
      • ► Mei (13)
      • ► April (50)
      • ► Maret (33)
      • ▼ Februari (22)
        • menggunakan marquee tool
        • funtastic blending
        • IR 1 (revisi 2)
        • IR 1 (revisi 1 )
        • cara menggunakan filter offset
        • sepia
        • rotate image
        • membuat gambar BW (hitam putih)
        • Colorful Gradient Effect on Black & White Photo
        • Colorful Gradient Effect on Black & White Photo
        • menggunakan color balance
        • mencerahkan gambar dengan mode screen + soft light
        • mencerahkan gambar dengan level
        • Membuat layer, copy layer, flatten image
        • 50 Brilliant Typography Designs to Inspire You
        • 50 Brilliant Typography Designs to Inspire You
        • Must Know Photoshop Keyboard Shortcuts
        • Must Know Photoshop Keyboard Shortcuts
        • Fake Miniature Photography to Inspire You
        • Fake Miniature Photography to Inspire You
        • Photo Effect and Photo Editing Tutorials to Check Out
        • Photo Effect and Photo Editing Tutorials to Check Out
      • ► Januari (6)
    • ► 2008 (177)
      • ► Desember (7)
      • ► November (38)
      • ► Oktober (32)
      • ► September (82)
      • ► Juli (10)
      • ► Juni (2)
      • ► Mei (4)
      • ► Maret (2)

Photoshop Effect And Tutorial © 2008 Free Premium Wordpress Themes and BlackQuanta | Bloggerized by : GosuBlogger