Photoshop Effect And Tutorial

  • Entries
  • Comments

  • Home
  • Posts RSS
  • Comments RSS
  • Edit

Cross Processing Photo in Photoshop

Rabu, 30 Desember 2009

This will be my last post....in 2009. Tonight or tomorrow (depending on which time zone you live in), we'll be celebrating the NEW YEAR! And there will be lots of pictures captured by your camera..So, I think it's a good idea to close our chapter in 2009 with a photo cross-processing tutorial.When film was widely used in photography, cross-processing is defined as the procedure of deliberately

21.36 | Label: more, Photo Effect in Photoshop, Photo: Cross Processing in Photoshop, PSD | 0 Comments  

Cross Processing Photo in Photoshop

This will be my last post....in 2009. Tonight or tomorrow (depending on which time zone you live in), we'll be celebrating the NEW YEAR! And there will be lots of pictures captured by your camera..So, I think it's a good idea to close our chapter in 2009 with a photo cross-processing tutorial.When film was widely used in photography, cross-processing is defined as the procedure of deliberately

21.36 | Label: more, Photo Effect in Photoshop, Photo: Cross Processing in Photoshop, PSD | 0 Comments  

Photo Manipulation

Senin, 14 Desember 2009

Here are the simple steps in doing photo manipulation:


Step 1:
- Simply choose two images from your file that you want to use for manipulation. (Just like the 2 images on this tutorial. "Shrek and Glenn")

- When you are done choosing 2 images or dragged them on your photoshop screen. Choose "Lasso Tool" icon that is found on the upper left side of the screen.


Step 2:
- And then choose a part or an area that will be used in manipulation. For example, on this tutorial, we will use the face of Glenn and make it into a Shrek look a like. :)
In choosing the specified area, just simply use your "mouse" and then "left" click.

Step 3:
- When you're done, choose "move" icon that is located at the top left of the photoshop screen. And simply drag it into the other image.

Step 4:
- And then simply adjust it by pressing "Ctrl T" on your keyboard. This was taught from the previous tutorials.
Step 5:
- When you are done adjusting and it fitted perfectly, you can now adjust the color by choosing "Color Replacement Tool" icon that is encircled on this image. And then press "Alt" by choosing color from that image that you like to replace on that part. And your done. :)

It is very simple though, for the first timers you have to review on the previous tutorials. :) Hope you enjoy! Watch out for more tutorials to be posted.

08.23 | Label: pen tool, photo edit, photo editing, photo manipulation, Photoshop, photoshop effects, photoshop tutorial, pictures | 0 Comments  

Diffusing Glow Effect

Rabu, 18 November 2009

Here are the simple steps in creating some effects through photoshop:

Diffusing Glow Effect

Step 1:

- Simply open or drag an image from your file into your photoshop screen and then choose the "filter" tab located at the top part of the screen.


Step 2:

- As you can see, there are lot of options you can choose from. On this tutorial, we will just choose "Distort" and then "Diffuse Glow". It's up to you what effects you would like to have.


Step 3:

- When you are done choosing an effect just simply press the "OK" button. :)


As simple as that you can enjoy creating an effect on your images.. :)

Watch out for more tutorials to be
posted. :) Have a good day!

08.16 | Label: diffusing glow effect, manipulation, pen tool, photo edit, photo editing, Photoshop, photoshop effects, photoshop tutorial, pictures | 0 Comments  

Photoshop CS2: As Real As it Gets

Sabtu, 14 November 2009

Today, I discovered two awesome stuffs on the internet. First, a brilliant song by Glass Pear called Ghost..but, let's not talk about that because we all know, it would be kind of off-topic here...and second, the 'Real Photoshop' image below. It's the coolest image I have seen in a long time...with brilliant concept and super-awesome execution. For a Photoshop enthusiast like me, every time I

22.26 | Label: Inspiration, Inspiration: Creative Photos | 0 Comments  

Photoshop CS2: As Real As it Gets

Today, I discovered two awesome stuffs on the internet. First, a brilliant song by Glass Pear called Ghost..but, let's not talk about that because we all know, it would be kind of off-topic here...and second, the 'Real Photoshop' image below. It's the coolest image I have seen in a long time...with brilliant concept and super-awesome execution. For a Photoshop enthusiast like me, every time I

22.26 | Label: Inspiration, Inspiration: Creative Photos | 0 Comments  

How to Flip an Image

Selasa, 10 November 2009

Here's a very simple tutorial on how to flip an image through photoshop:


Step 1:

- Open, choose or drag an image into your photoshop screen.


Step 2:

- Click the "Image" button located at the top of your screen. And simply choose "Image Rotation".


Step 3:

- After choosing the image rotation, you can either flip the image horizontally or vertically. In this tutorial, I just use the "horizontal" flipping. And you're done. :)


Very simple isn't it? Watch out for more tutorial to be posted. Thank you for visiting. :)


13.06 | Label: clear photo, clipping path, flip an images, manipulation, pen tool, photo edit, photo editing, Photoshop, photoshop tutorial, pictures | 0 Comments  

Collection of Brilliant Logo Design

Kamis, 05 November 2009

Some people are obsessed with logo and some just enjoy looking at something pretty and brilliantly designed. Whoever you are, we hope this post 25 Brilliantly Designed Logo can give you a little inspiration on your next project. Most of the logos here display the brilliant use of negative space in logo design. And some just need to be included here because they're too cool to be left out. Eh,

05.30 | Label: Inspiration, Inspiration: Logo Design, more | 0 Comments  

Collection of Brilliant Logo Design

Some people are obsessed with logo and some just enjoy looking at something pretty and brilliantly designed. Whoever you are, we hope this post 25 Brilliantly Designed Logo can give you a little inspiration on your next project. Most of the logos here display the brilliant use of negative space in logo design. And some just need to be included here because they're too cool to be left out. Eh,

05.30 | Label: Inspiration, Inspiration: Logo Design, more | 0 Comments  

How to Put Text on an Image

Minggu, 01 November 2009


Here are the simple steps in how to put text on an image:


Step 1:

- Open or drag an image on your photoshop screen. And simply choose the "Text" icon located at the left of your screen. (encircled on this image)


Step 2:

- Just highlight the location that you want to place the text or the word. For example, on this image, it was highlighted above.


Step 3:

- And then, you can adjust the font size by just clicking the "font size" icon located at the top of the screen. And if you want to change the text color, just click the color box and choose the color that you want. (encircled on this image)


Step 4:

- If you want to change the font face or the lettering. Simply click the down arrow encircled on this image.


Step 5:

- And you can write whatever you want. After writing just click the "Layer text" located at the right side of your screen. (encircled on this image) And you're done! :)

Very simple! Hope you learn something from it. Watch for more tutorials to be posted.


10.20 | Label: clear photo, clipping path, manipulation, pen tool, photo edit, photo editing, Photoshop, photoshop tutorial, pictures, text on images | 0 Comments  

Gradient Special Effects

Jumat, 23 Oktober 2009
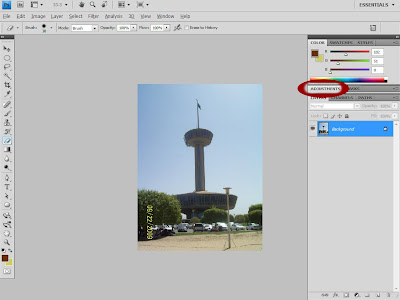
There are lot of great tools in doing some special effects into our image, one of this is using the gradient tool in photoshop. Here are the simple steps in doing so:

Step 1:

-Drag or open an image from your file to your photoshop.


Step 2:

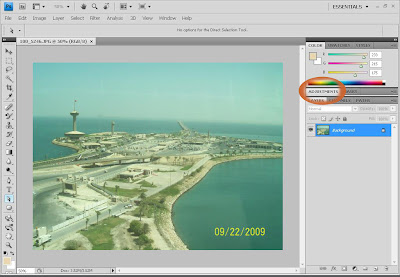
-Go to "Adjustments" tab, located at the right side of your screen, and choose the "Gradient Map" icon, (encircled on this image.)


Step 3:


-You can choose any colors you like. In this tutorial we will just use the black and white gradient.
(encircled on this image.)


Step 4:


-After you have chosen your gradient color. You can also choose some special effects colors by just clicking the "down" arrow. (encircled on this image.)


Step 5:


-And simply choose "Special Effects" located below the tab. (encircled on this image.)

-And simply choose any effect you like :)..


Very simple isn't it? :) Watch out for more simple tutorials to be posted. Thank you.

05.22 | Label: black and white background, clear photo, clipping path, manipulation, pen tool, photo edit, photo editing, Photoshop, photoshop tutorial, pictures | 0 Comments  

How To Make Black and White Image

Selasa, 20 Oktober 2009


Here are the simple steps in making black and white image:


Step 1:

-Open or drag an image to your photoshop screen.
-And choose "Adjustments" tab located right side of your screen.


Step 2:

-Choose the "Black and White" icon found in the adjustment tab. (encircled on this image)


Step 3:

-You have now your black and white image, however, you can still adjust the contrast and brightness if you like. :)


Very simple. :) Watch out for more tutorials to be posted.. Thank you guys.

12.39 | Label: black and white background, clear photo, clipping path, manipulation, pen tool, photo edit, photo editing, Photoshop, photoshop tutorial, pictures | 0 Comments  

How To Make Transparent Background

Jumat, 16 Oktober 2009


Here are the simple steps in making a transparent background:


Step 1:

- Open or drag an image into your photoshop screen.


Step 2:

-And begin clipping the image, that was thought from previous tutorials. (For first timers CLICK HERE)


Step 3:

- Make a selection, by just pressing right click on the path, encircled on this image. (If you didn't get it on how to CLICK HERE)


Step 4:

-Go to the "layer" tab and double click the bar encircled on this image to make it "layer 0".


Step 5:

-And then press the "Layer Mask" icon, located at the lower right corner on your screen.


As simple as that.. :) Please watch out for more tutorials to be posted.

04.11 | Label: clear photo, clipping path, manipulation, pen tool, photo edit, photo editing, Photoshop, photoshop tutorial, pictures, transparent background | 0 Comments  

How To Adjust Brightness Using Curves


Here are the simple steps in adjusting brightness of an image using curves:


Step 1:
-Open or drag the image you want to adjust into your photoshop screen.
-On the right side of your screen, choose the "Adjustments" tab.
-On the adjustments tab, there are many of options you can choose from.
(Let's just use the "curves")


Step 2:

-If you like to adjust it directly, you can use the "Auto" button found in the upper right corner of the curve's section.


Step 3:

-If you are satisfied of the "Auto" adjustments, you can adjust it by yourself, by just dragging or sliding the line on the bar up and down.. :)

Very simple isn't it? :)
Watch out for more tutorials to be posted..

02.10 | Label: clear photo, clipping path, light adjustment, manipulation, pen tool, photo edit, photo editing, Photoshop, photoshop tutorial, pictures | 0 Comments  

Background Manipulation

Minggu, 11 Oktober 2009

Here are the steps in photo editing for background manipulation:


Step 1:

-Choose 2 images from your files, for example on this tutorial, a nice background and a person. Simply drag it to your photoshop screen.


Step 2:

- Clip the image of the person,
(for first timers, please click here for clipping path tutorial.)


Step 3:

- And when you are done clipping the image, you have to make a selection like we did on the previous tutorial, click here.


Step 4:

-When you already make a selection. Choose the "Move tool" icon that is located on the upper left corner on the sidebar of your screen. And drag the image to the second photo and that is the background. For example, the beach.


Step 5:

- You can adjust the image size by pressing "Ctrl + T" and by adjusting the image color press "Ctrl + U" on your keyboard.

- To make it more realistic "blur" the edges of the clipped image by using the "Blur tool" icon. And for the shadow you can just brush it by using "Brush tool". (encircled with RED on this image. )
(Note: this will be posted on the next tutorial.)

13.48 | Label: clear photo, clipping path, manipulation, pen tool, photo edit, photo editing, Photoshop, photoshop tutorial, pictures | 0 Comments  

How to do Clipping Path Using Pen Tool

Here are the steps on how to do clipping path using pen tool:

(Please click the image to enlarge)
Step 1:
- Open or drag an image from your file to your photoshop screen.
- Select the "pen tool" icon found on the left side of your screen.
- Choose the icons that was encircled above this image. And simply go to the "path" bar located on the right side of your screen.
Step 2:
- To view the specific edges or area to be path use the "Zoom" tool icon that is located on the upper part of the screen or simply press "Ctrl++" on your keyboard. And path the area by pressing 'left click" on your mouse.
- If you want to move the image to side by side or up and down. Use the "Hand" tool icon located on the upper part of your screen near the zoom tool icon or simply press the spacebar on hold and move it by using your mouse. And "double" click the word "Work path" on the path bar and press "enter" or "OK". To make it "Path 1".

Step 3:
- While clipping the images, you should connect the line or dots from the clipped edges to where you started. You can see a circle beside the pen tool icon. And now your done. Bring the image back to its original size.


- This is just a tutorial on how you clip the image using pen tool. You can start from a very simple image, just to practice. When you already know how to clip, you can do a lot of things for photo editing. Watch out for a lot of tutorials to be posted. :)

03.22 | Label: clipping path, clone stamp tool, pen tool, photo edit, photo editing, Photoshop, photoshop tutorial, pictures | 0 Comments  

Removing Unwanted Object Using Clone Stamp Tool

Selasa, 06 Oktober 2009

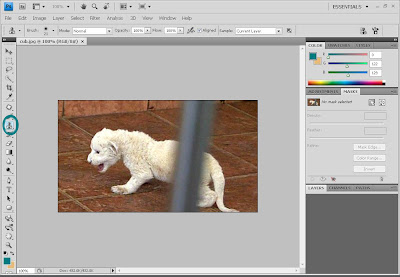
This tutorial is only intended for removing unwanted object using Clone stamp tool. For viewers, the result on this tutorial would need an additional tutorial for photo manipulation, but let us just focus first on removing the unwanted object.
Step 1:
- Simply drag an image you want to edit. And choose the "clone stamp tool icon" located on the left side of the photoshop.
Step 2:
- When you are done choosing the clone stamp tool icon, adjust the brush size on where you are comfortable.
- On this photo you have to remove the gray bar. Choose a part on the floor by pressing "alt + left click" and release the mouse. Try to brush it on the unwanted object on your photo. For example here, the upper part of the gray bar.

Step 3:
- In the middle part, you have to choose a part on the dog or any part on your image that would correlate on the unwanted part, by pressing again "alt + left click" and release. And again brush it to the part of unwanted object.

Step 4:
- On this result you need to do photo manipulation. In which I will post on my next tutorial. You need to do a simple image first that has unwanted object that should be removed..


I hope you already learn the steps in removing unwanted objects from your photo in using the "Clone Stamp Tool" :) Watch out for more tutorials to be posted. Thank you!

05.24 | Label: clear photo, clipping path, clone stamp tool, photo edit, photo editing, Photoshop, photoshop tutorial, pictures, unwanted objects | 0 Comments  

Body Resizing through Photoshop

Minggu, 04 Oktober 2009


Step 1:


- Drag an image you want to edit in photoshop. Then choose "Filter" button found in the upper part portion.


Step 2:

- On the filter tab choose "Liquify" option.

- Or simply press "Shift+Ctrl+X" on your keyboard.


Step 3:
- A new table will appear and choose the "Forward Warp Tool", found in the upper left corner.

- And on the right side, you will see "Tool Options" for the brush size, density and pressure. Adjust it to where you are comfortable.

- Resize the part of the image you want to edit.


Step 4:
- After you are done resizing. You can "shrink" the other part to make it more realistic.

- For example here, the shoulder part. You can shrink that part by using "Pucker Tool", found in the 4th button from the top left.

- When you are done editing, Press "OK", found in the upper right corner.


Step 5:

- "Shift+Ctrl+S" to Save. :)


Thank you for visiting! More tutorials to be posted.. :)

13.59 | Label: body resizing, clipping path, color adjustments, CS4, manipulation, photo edit, photo editing, Photoshop, photoshop tutorial, pictures | 0 Comments  

Postingan Lebih Baru Postingan Lama Beranda
Langganan: Postingan (Atom)


  • Labels

    • Actions (33)
    • Actions: ActionSection (2)
    • Actions: Canvas Painting Effect (1)
    • Actions: Cross Processing Action (1)
    • Actions: Cross Processing Curves (2)
    • Actions: Dark Gloomy Effect (1)
    • Actions: Dragan Effect (1)
    • Actions: Dream Big Vol 1 (1)
    • Actions: Dream Big Vol 2 (1)
    • Actions: Enhance Portrait Coloring (1)
    • Actions: Glowing Model (1)
    • Actions: Icon Coloring in Photoshop (2)
    • Actions: Old Vintage Photo (2)
    • Actions: Pencil Sketch Effect (1)
    • Actions: Polaroid Coloring (1)
    • Actions: Retro Old Photo Effect (1)
    • Actions: Text Effects (3)
    • Actions: Turn Photo to Cartoon Effect (1)
    • Actions: Yellowish Retro Coloring (1)
    • anime (1)
    • background change (1)
    • basic photoshop (12)
    • Beginner Tutorial (4)
    • black and white background (2)
    • body resizing (1)
    • Brushes: All (23)
    • Brushes: Blood Splatter (2)
    • Brushes: Butterfly (2)
    • Brushes: Doodles (2)
    • Brushes: Floral (2)
    • Brushes: Frame Border (2)
    • Brushes: Grunge (2)
    • Brushes: Halloween Brush Set (1)
    • Brushes: Polaroids (2)
    • Brushes: Swirl and Curl (2)
    • Brushes: Text (2)
    • Brushes: Vector (2)
    • Brushes: Wings (2)
    • cartoon (1)
    • clear photo (8)
    • clipping path (12)
    • clone stamp tool (2)
    • color adjustments (2)
    • color correction (1)
    • colorizing (1)
    • contest (1)
    • Cropping (2)
    • CS4 (2)
    • diffusing glow effect (1)
    • flip an images (1)
    • Fonts (15)
    • Fonts: All (2)
    • Fonts: All Uppercase (1)
    • Fonts: Cute (1)
    • Fonts: For Icons (2)
    • Fonts: Grunge (2)
    • Fonts: Handwriting (4)
    • Fonts: Poster (1)
    • Fonts: Romantic (3)
    • Fonts: Script (1)
    • Icon Coloring in Photoshop (30)
    • Image Saving (2)
    • infra red (3)
    • Inspiration (24)
    • Inspiration: 3D Typography (1)
    • Inspiration: Anti-smoking ads (2)
    • Inspiration: cats photos (2)
    • Inspiration: Color Combo for Design (1)
    • Inspiration: Colorful Patterns (1)
    • Inspiration: Creative Photos (2)
    • Inspiration: Ideas that Brighten Up Your Day (1)
    • Inspiration: Little Things (1)
    • Inspiration: Logo Design (2)
    • Inspiration: Miniature Photography (2)
    • Inspiration: Rule of Thirds (2)
    • Inspiration: Scenic and Landscapes Wallpapers (2)
    • Inspiration: Selective Coloring Photos (1)
    • Inspiration: Simple Desktop Wallpapers (1)
    • Inspiration: Toy Story (1)
    • Inspiration: Typography (2)
    • intermediate (26)
    • light adjustment (1)
    • link (2)
    • manipulation (11)
    • more (283)
    • pen tool (12)
    • Photo Albums (3)
    • photo edit (15)
    • photo editing (16)
    • photo effect (29)
    • Photo Effect in Photoshop (81)
    • photo manipulation (3)
    • photo retouch (6)
    • Photo: Black and White Photography Effect (2)
    • Photo: Blue Tone Coloring (2)
    • Photo: BW Image with a HInt of Color (2)
    • Photo: Canvas Painting Effect (2)
    • Photo: Classic Coloring Photo (1)
    • Photo: Colorful Gradient Effect (2)
    • Photo: Combined Polaroid Effect (1)
    • Photo: Comic Effect (2)
    • Photo: Create Photo From Text (1)
    • Photo: Cross Processing in Photoshop (2)
    • Photo: Dashed Line Around Cutout Image (1)
    • Photo: Dotted Pixelated Photo (1)
    • Photo: Dramatic Rain Effect (2)
    • Photo: Fill Shape with Text (1)
    • Photo: Fisheye Effect (1)
    • Photo: Fun Effect in Photoshop (1)
    • Photo: Get a Glowing Image (2)
    • Photo: Glamorous Magazine Glow Look (2)
    • Photo: Glowing Angelic Effect (2)
    • Photo: Glowing Demon Eyes Effect (2)
    • Photo: Halftone Pattern Effect (2)
    • Photo: Halftone Retro (2)
    • Photo: Halftone Wave Effect (1)
    • Photo: Lens Flare (1)
    • Photo: Light Effects (2)
    • Photo: Lomo Effect (1)
    • Photo: Metallic Toning Potrait (1)
    • Photo: Miniature Model Look (2)
    • Photo: Mosaic Effect (1)
    • Photo: Nostalgic FairyTale Effect (2)
    • Photo: Old Photo Sephia Effect (2)
    • Photo: Pencil Sketch Effect (2)
    • Photo: Photo Editing with Gradient Map (1)
    • Photo: Pop Art Tutorial (2)
    • Photo: Popping Reds (1)
    • Photo: Retro Polaroid Coloring (2)
    • Photo: Single Color Image (2)
    • Photo: Sketch Effect (1)
    • Photo: Stencil Art Effect (2)
    • Photo: Turn 2D Image to 3D (2)
    • Photo: Turn Image to Cartoon (2)
    • Photo: Turn Photo to Vector Art (2)
    • Photo: Vignette Effect (1)
    • Photo: Vintage Sepia Tone (2)
    • Photoshop (17)
    • photoshop action (4)
    • photoshop border (1)
    • photoshop brush (11)
    • photoshop effects (4)
    • photoshop fix (5)
    • photoshop plug in (17)
    • photoshop review (12)
    • photoshop tips and tricks (1)
    • photoshop tutorial (16)
    • pictures (16)
    • poster (1)
    • pribadi (1)
    • PS Techniques and Tricks (42)
    • PS: BW Watercolor Painting (2)
    • PS: Change Image Color (2)
    • PS: Create Border (2)
    • PS: Create Dotted and Dashed Border (1)
    • PS: Creating Borders (1)
    • PS: Cutting Image Out of Background (2)
    • PS: Delete Background using Extract Filter (2)
    • PS: Dotted Pattern (2)
    • PS: Full List of Tips (1)
    • PS: Icon Coloring Action Files (2)
    • PS: Icon Cropping Tips (2)
    • PS: Image Editing using Adjustment Layer (2)
    • PS: Keyboard Shortcuts (2)
    • PS: Learn how to use Photoshop Actions (2)
    • PS: Rising Sun Effect (2)
    • PS: Rotate Brushes (2)
    • PS: Rounded Edges and Puzzle Effect (2)
    • PS: Rounded Edges Border (1)
    • PS: Rule of Thirds (2)
    • PS: Save and Use Pattern (2)
    • PS: Simple Image Blending (2)
    • PS: Smart Guides (2)
    • PS: Sunburst Effect (2)
    • PS: Turn Photo to Comic Sketch (2)
    • PS: Using Light Textures to Decorate Photo (1)
    • PS: Using Photo Effect Action (1)
    • PSD (32)
    • PSD: 5 Popular Coloring Effects (1)
    • PSD: ALL (1)
    • PSD: Caramel Coffee Coloring (1)
    • PSD: Coloring (2)
    • PSD: Dark Chocolate Coloring (1)
    • PSD: Dream Big Vol 2 (1)
    • PSD: Fade Coloring on Your Photo (1)
    • PSD: Faded Spring Color (1)
    • PSD: Gradient Photo FX (1)
    • PSD: How to Use Coloring PSD (2)
    • PSD: Image Coloring (1)
    • PSD: Mosaic Photo Template (1)
    • PSD: Polaroid Coloring (1)
    • PSD: Pop Art Coloring (1)
    • PSD: Retro Gradient Coloring (1)
    • PSD: Soft Pink Coloring (1)
    • PSD: Summer Sunshine Color (1)
    • PSD: Yellowish and Greenish Coloring (1)
    • special effect (2)
    • techniques (1)
    • text effect (17)
    • text on images (1)
    • Text: Bling Text Effect (2)
    • Text: Glowing Apple Mac Text (2)
    • Text: Glowing Neon Light Text (2)
    • Text: Glowing Text (2)
    • Text: Reflection Text (2)
    • Textures: Abstract (2)
    • Textures: All (39)
    • Textures: Clouds (2)
    • Textures: Colored Pattern (1)
    • Textures: Fabric (1)
    • Textures: Floral (2)
    • Textures: Geometric (2)
    • Textures: Gradient Set (1)
    • Textures: Grunge (5)
    • Textures: Grunge Paint (2)
    • Textures: Grunge Set 1 (2)
    • Textures: Lights (1)
    • Textures: Paper (5)
    • Textures: Pattern (2)
    • Textures: Pattern Sites (2)
    • Textures: Retro Color (1)
    • Textures: Scrapbook (1)
    • Textures: Stripes (10)
    • Textures: Wood (1)
    • transparent background (1)
    • tutorial (1)
    • unwanted objects (1)
    • vector (1)
    • vector art (1)
    • with action (13)

    Blog Archive

    • ► 2011 (42)
      • ► November (4)
      • ► Oktober (7)
      • ► September (2)
      • ► Juli (3)
      • ► Juni (2)
      • ► Mei (5)
      • ► April (5)
      • ► Maret (6)
      • ► Februari (4)
      • ► Januari (4)
    • ► 2010 (50)
      • ► November (1)
      • ► Oktober (6)
      • ► September (3)
      • ► Agustus (3)
      • ► Juli (4)
      • ► Juni (12)
      • ► Mei (8)
      • ► April (6)
      • ► Maret (1)
      • ► Februari (1)
      • ► Januari (5)
    • ▼ 2009 (168)
      • ▼ Desember (3)
        • Cross Processing Photo in Photoshop
        • Cross Processing Photo in Photoshop
        • Photo Manipulation
      • ► November (7)
        • Diffusing Glow Effect
        • Photoshop CS2: As Real As it Gets
        • Photoshop CS2: As Real As it Gets
        • How to Flip an Image
        • Collection of Brilliant Logo Design
        • Collection of Brilliant Logo Design
        • How to Put Text on an Image
      • ► Oktober (11)
        • Gradient Special Effects
        • How To Make Black and White Image
        • How To Make Transparent Background
        • How To Adjust Brightness Using Curves
        • Background Manipulation
        • How to do Clipping Path Using Pen Tool
        • Removing Unwanted Object Using Clone Stamp Tool
        • Body Resizing through Photoshop
      • ► September (3)
      • ► Agustus (9)
      • ► Juli (4)
      • ► Juni (7)
      • ► Mei (13)
      • ► April (50)
      • ► Maret (33)
      • ► Februari (22)
      • ► Januari (6)
    • ► 2008 (177)
      • ► Desember (7)
      • ► November (38)
      • ► Oktober (32)
      • ► September (82)
      • ► Juli (10)
      • ► Juni (2)
      • ► Mei (4)
      • ► Maret (2)

Photoshop Effect And Tutorial © 2008 Free Premium Wordpress Themes and BlackQuanta | Bloggerized by : GosuBlogger